← Back to overview
End-to-End Installation · Setup Guide

IDEAgent Setup Guide

Everything you need to get IDEAgent running in your development environment — from installing the plugins in PyCharm to orchestrating your private Docker containers and connecting the agentic tool window.

Available on the JetBrains Marketplace — install directly into PyCharm / IntelliJ.

Full suite setup & onboarding video

This step-by-step video demonstrates setting up the complete IDEAgent suite on a resource-constrained machine — run on a MacBook Air (Late 2018, Intel Core i5, 3.7 GB RAM). It walks through initial onboarding, container startup, and real-time agent verification.

Watch on YouTube: Full Suite Setup Tutorial (MacBook Air Late 2018 i5 3.7GB RAM) ↗

Step 1 — Download from JetBrains Marketplace

Install both official plugins from within PyCharm / IntelliJ under Settings → Plugins → Marketplace:

  1. IDE Agent — the core in-IDE agentic tool window providing Chat, persistent Threads, planned Tasks, and in-editor Edits.
  2. RAG File Watcher — the background sync plugin that monitors project file modifications and keeps the vector search index fresh.

Activate your 30-day free trial or confirm your subscription directly through the JetBrains Marketplace dialog. Note: JetBrains activation is managed directly by JetBrains — the IDEAgent backend setup begins immediately after.

Step 2 — Onboarding trigger & secure keychain registration

When you launch IDEAgent for the first time in PyCharm, the plugin performs an automated environment check:

  • Is there a registration? During first run, your registration completes and your API key is stored securely in your operating system's native keychain (via IntelliJ's PasswordSafe) — never in plaintext files.
  • Is there a gateway running? The plugin detects whether a gateway backend is already active.
The "Setup" start condition: Once registration is confirmed and the plugin detects no gateway is running yet, it automatically opens the onboarding Setup page to guide container orchestration.

Step 3 — Docker installation prerequisite

The IDEAgent backend runs in lightweight Docker containers. You can run these containers directly on your development laptop (macOS, Linux, or Windows) or on a dedicated workstation / home server.

Make sure Docker is installed and the daemon is active before proceeding:

  • Docker Desktop / Docker Engine: Follow the official installation instructions at docs.docker.com/get-docker ↗.
  • Verify Docker is running by opening a terminal and typing docker --version.

Step 4 — Register for Docker Hub image access

On the onboarding Setup page, click the Register button. This confirms product usage for your seat and grants your machine authorized access to download the official production container images from Docker Hub.

Step 5 — Confirm your hardware configuration

Next, the setup page prompts you to select the hardware profile of the machine running Docker:

  • CPU only (No GPU) — for standard laptops, Apple Silicon Macs, or servers without discrete acceleration. Uses optimized CPU quantization.
  • NVIDIA GPU — leverages CUDA acceleration for ultra-fast local embeddings, RAG indexing, and local inference.
  • AMD GPU — leverages ROCm acceleration for compatible AMD graphics hardware.

Review and confirm your selection to ensure the setup script applies the correct image tags, device passthroughs, and container flags.

Step 6 — Run the deployment script in your terminal

Copy the provided terminal command from the onboarding page into the terminal of the machine running Docker.

  1. Authenticate Docker Hub: Confirm that the terminal displays a successful Docker Hub login.
  2. Execute the setup script: Run the generated orchestration command. The script automatically:
    • Creates the isolated internal Docker bridge network (ideagent-network).
    • Pulls the required container images (gateway, mpc-server, and rag-server).
    • Configures environment variables, volumes, and starts the container stack.
    • Cleans up temporary YAML configuration files.
    • Automatically logs out from Docker Hub: The access credentials utilize rotating, time-limited security tokens that are safely cleared once images are downloaded.

Step 7 — Verify containers with docker ps

In your terminal, execute the following command to verify that all three containers are healthy and running:

docker ps

Confirm that the following three containers appear in the list with an Up status:

  • gateway — orchestrates agents, manages context, and handles tool routing (listening on port 8765).
  • mpc-server — exposes project context, memory, and code intelligence tools (listening on port 5820).
  • rag-server — provides vector embeddings and lexical search across your indexed repositories.

Step 8 — Restart PyCharm & configure plugin settings

Close and reopen PyCharm so your environment reloads cleanly. Open Settings / Preferences → Tools → IDEAgent to finalize your connection settings:

1. Gateway URL

In the Main Settings screen, enter your Gateway address:

  • If Docker runs on the same machine as PyCharm: use http://127.0.0.1:8765 (or http://localhost:8765).
  • If Docker runs on a remote server / LAN machine: use that machine's physical LAN IP, e.g. http://192.168.1.50:8765.

Click Test connection to verify the green indicator.
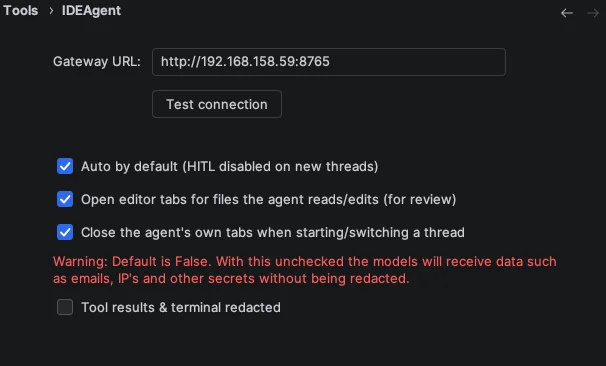
IDEAgent main settings with Gateway URL and Test Connection button
Main settings. Point the Gateway URL to http://127.0.0.1:8765 (or your server's IP) and test the connection.

2. MCP Server Configuration (Physical Machine IP)

Go to MCP Servers and click Add.
Important: The MCP server configuration requires the physical machine IP address of the machine hosting the containers so communication between the host, IDE, and container network resolves accurately:

{ "mcpServers": { "mcp-server": { "url": "http://<Physical-Machine-IP>:5820/mcp", "type": "http" } } }

Press Refresh status and confirm the indicator displays a green dot (connected).
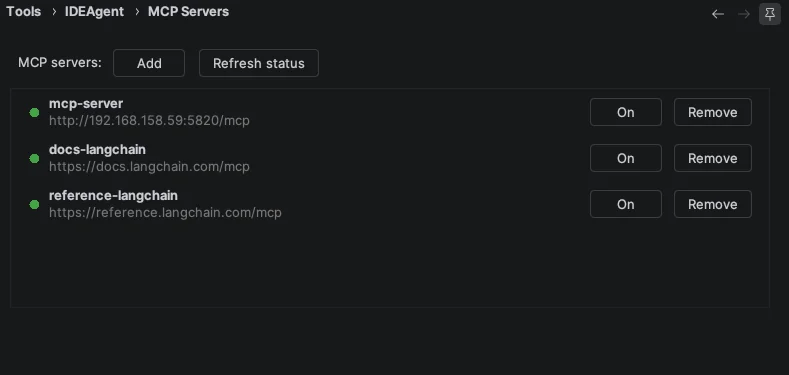
MCP Servers configuration screen showing connected status on port 5820
MCP Servers. Configure mcp-server using your host IP and port 5820.

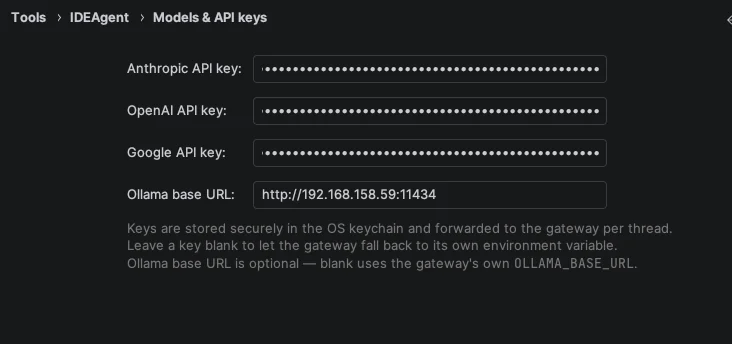
3. Models & API Keys

In Models & API keys, choose your preferred LLM provider:

  • Cloud Models: Enter your Anthropic, OpenAI, or Google API keys. Keys are stored securely in your OS keychain (via PasswordSafe) and forwarded per thread.
  • 100% Offline with Ollama: Leave cloud keys blank and enter your Ollama endpoint in the Ollama base URL field (e.g., http://127.0.0.1:11434).
Models and API Keys configuration screen
Models & API keys. Add your provider keys or set your local Ollama address.

4. Dedicated Models & RAG Watcher

Under Dedicated Models, select fast, lightweight models for background operations:
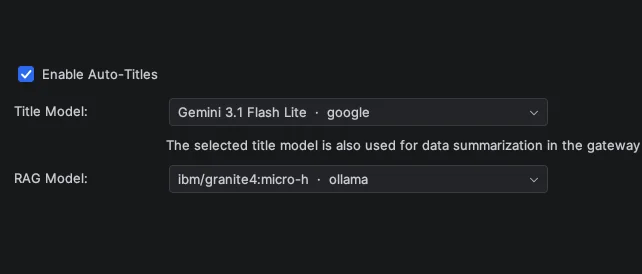
  • Title Model: Automatically names conversations and summarizes thread actions.
  • RAG Model: Formulates search queries and processes vector retrieval.
Dedicated models settings
Dedicated models. Enable auto-titles and select your helper models.

New plugin functionality in latest releases

Recent releases introduce powerful workflow enhancements directly inside PyCharm:

  • 4-Tab Native Tool Window:
    • Chat: Conversational prompt streaming with real-time markdown and syntax highlighting.
    • Threads: Persistent, multi-turn chat sessions with full context memory and instant switching.
    • Tasks: Real-time task planning view showing the agent's scheduled actions before and during execution.
    • Edits: Visual diff inspection and file edit history directly integrated with IntelliJ's native editor.
  • Per-Thread "Auto" HITL Switch: Toggle human-in-the-loop per thread. Auto OFF requires manual approval for every consequential action; Auto ON lets the agent work autonomously.
  • Permanent Safety Gating: Regardless of whether Auto is ON, high-consequence shell operations (git, docker, sudo) are always gated and require explicit user confirmation.
  • Egress Secret Redaction: Built-in pattern matching automatically redacts IP addresses, tokens, and email addresses (<<REDACTED_*>>) from tool outputs before reaching the LLM.
  • Fully Local Voice (Whisper & Piper): Dictate requests using local Whisper speech-to-text (e.g. brew install whisper-cpp) and listen to agent answers via Piper text-to-speech (pip install piper-tts). Audio never leaves your computer.
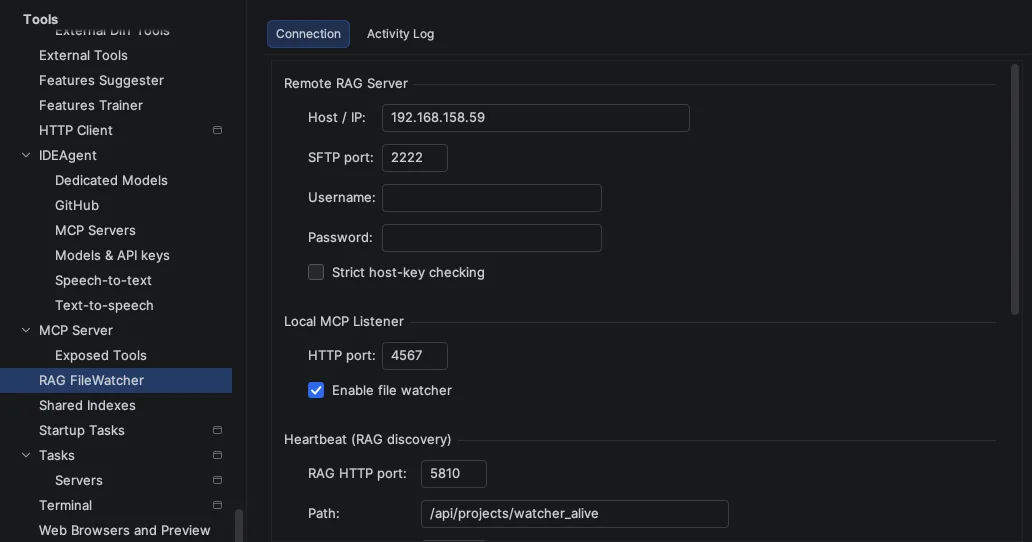
RAG File Watcher settings and index status
Continuous Indexing. The RAG File Watcher automatically indexes codebase changes as you write code.